
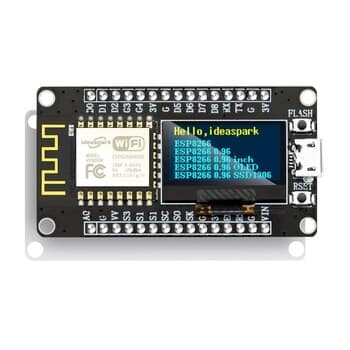
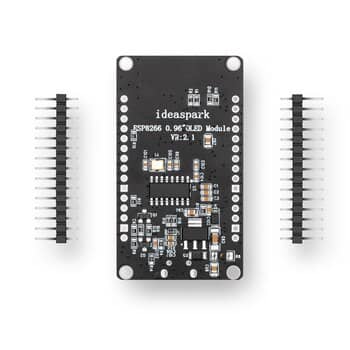
The NodeMCU with OLED has been one of the staples in our IoT arsenal, especially heavily in our Christmas lights collection of projects. This tiny development board punches well above its weight, offering WiFi connectivity, a built-in display, and enough GPIO pins to control just about anything – all for under $10.
What is the NodeMCU?
The NodeMCU is an open-source IoT platform built around the ESP8266 WiFi chip. Think of it as an Arduino with built-in WiFi – except cheaper, more powerful, and with a few extra tricks up its sleeve.
The version we use includes an integrated OLED display (usually 0.96″ SSD1306), which is incredibly handy for debugging, showing status information, or creating standalone devices that display data without needing a computer.

Key Specifications
- Microcontroller: ESP8266 (ESP-12E module)
- CPU: Tensilica L106 80MHz (can be overclocked to 160MHz)
- Flash Memory: 4MB
- RAM: 80KB
- WiFi: 802.11 b/g/n (2.4GHz only)
- OLED Display: 0.96″ SSD1306, 128×64 pixels, I2C interface
- GPIO Pins: 11 usable pins (D0-D8, plus analog)
- Power: Micro USB or 3.3V input
- Dimensions: Roughly 50mm × 26mm (varies by version)
Why We Love This Board
Built-in WiFi
No need for separate WiFi shields or modules. The ESP8266 handles all your wireless communication natively, making it perfect for IoT projects, web-connected sensors, and remote monitoring.
The OLED Display
Having a screen directly on the board is game-changing for development. You can display sensor readings, WiFi status, error messages, or even create simple user interfaces – all without wiring up an external display.
Micro USB Power
Power it from your computer for development, or from any USB power adapter for deployment. No specialty power supplies required – the same cable you use to program it also powers it.
Arduino IDE Compatible
Program it using the familiar Arduino IDE with a simple board manager addition. Existing Arduino sketches often port over with minimal modifications.
Home Assistant Integration
This is where things get exciting. The NodeMCU pairs beautifully with Home Assistant through several methods:
ESPHome
The easiest integration path. ESPHome lets you configure sensors and devices using YAML – no coding required. Define your sensors, choose your MQTT or API settings, and flash the firmware. Home Assistant discovers them automatically.
WLED
For controlling addressable LED strips, WLED is the go-to solution. Flash WLED to your NodeMCU, connect your LEDs, and you’ve got a fully-featured LED controller with Home Assistant integration out of the box.
MQTT
For custom applications, the NodeMCU can publish and subscribe to MQTT topics. Home Assistant’s MQTT integration makes this seamless – your sensors appear as entities in the dashboard automatically.
Projects We’ve Built
Here are some of the ways we’ve used the NodeMCU with OLED in our projects:
- Custom LED Tunnel – Controlling 600 LEDs for Christmas light shows
- Custom LED Star – Programmable Christmas decoration with WLED
- Custom LED Matrix – Billboard-style display project
- Climate monitoring – Temperature and humidity sensors displayed on the OLED
- Smart switches – WiFi-enabled relay controllers for automation
Quick Start Code Example
Here’s a minimal Arduino sketch to get WiFi connected and display a message on the OLED:
#include <ESP8266WiFi.h>
#include <Wire.h>
#include <Adafruit_SSD1306.h>

#define OLED_ADDRESS 0x3C
Adafruit_SSD1306 display(128, 64, &Wire, -1);

void setup() {
  WiFi.begin("your-SSID", "your-password");

  display.begin(SSD1306_SWITCHCAPVCC, OLED_ADDRESS);
  display.clearDisplay();
  display.setTextColor(WHITE);
  display.setTextSize(1);
  display.setCursor(0,0);
  display.println("NodeMCU Online!");
  display.display();
}

void loop() {
  // Your code here
}
Pro Tips
- Power budget: The ESP8266 can draw significant current during WiFi transmission. If your project misbehaves, check your power supply – 500mA minimum recommended.
- GPIO warnings: Not all pins are safe to use. D0-D8 have quirks (some are pulled up, some control the boot process). Check the ESP8266 pinout reference before wiring.
- 3.3V logic: The NodeMCU operates at 3.3V, not 5V. If interfacing with 5V devices, use level shifters or optocouplers to avoid damage.
- Keep WiFi active: Deep sleep mode saves power but breaks WiFi connections. For always-connected devices, use light sleep or stay awake.
- Backup your code: The ESP8266 doesn’t have native USB debugging. Serial output is your friend – use Serial.println() liberally during development.
Where to Buy in Australia
- AliExpress: The cheapest option (~$5-10 AUD for NodeMCU with OLED). Search using code ALCKQMN8 or check this listing. Allow 2-4 weeks for shipping.
- Core Electronics: Australian retailer (~$15-20 AUD). Faster shipping, local warranty.
- Little Bird Electronics: Another Australian option with good stock levels.
Useful Resources
- ESP8266 Pinout Reference – Essential guide to GPIO pins and their quirks
- NodeMCU GPIO with Arduino IDE – Tutorial on pin programming
- ESPHome Documentation – For Home Assistant integration
- WLED Documentation – For LED control projects
The Verdict
For under $10, you get WiFi, a display, USB power, and a development platform that integrates with absolutely everything. The NodeMCU with OLED is one of the best value propositions in the maker world.
Buy yours today at AliExpress and start building!
Discover more from JRB Consulting
Subscribe to get the latest posts sent to your email.