
Samsung has announced that from October 2026, access to the SmartThings API will move behind a paywall — a US$4.99/month “personal plan” (Samsung’s announcement). If you control Samsung devices through Home Assistant, you’re in scope. We weren’t keen on renting access to an air conditioner we already own, so we went the other way entirely: a small ESP32 board wired straight into the AC’s own service bus, running ESPHome. Total hardware cost: about US$18. Ongoing cost: zero.
This is the full walkthrough for a Samsung ducted unit (our model: AC120TNHPKG/SA, a 12kW ducted system). The same approach covers a wide range of Samsung NASA-protocol splits and ducted units — more on compatibility below.
The problem
Our ducted AC is controlled by a Samsung wall controller, and until now the smart-home integration path was Samsung’s SmartThings cloud: the AC talks to Samsung’s servers, Home Assistant asks Samsung’s servers, everyone pays Samsung their cloud toll (or, from October, their API toll).
But the wall controller isn’t the only way in. Samsung ducted units (and many splits) have a wired indoor bus — terminals F1/F2 — that carries Samsung’s “NASA” protocol at 9600 baud 8E1. It’s a plain RS485-style serial bus, it’s how the wall controller itself talks to the indoor unit, and it carries everything: mode, setpoint, room temperature, error codes, and even the outdoor unit’s power meter. If you can tap that bus, you don’t need Samsung’s cloud at all.
The open-source esphome_samsung_hvac_bus project implements exactly that: an ESPHome external component that speaks NASA (and NonNASA) out of the box. Pair it with an ESP32 and an RS485 transceiver and the AC becomes just another local device on the network.
What didn’t work (so you can skip it)
Before the bus route we spent a fair bit of time on the “local cloud-free OCF” route (Local Open Connectivity, CoAPS/DTLS on the unit’s network port). Short version: this generation of Samsung appliances only accepts credentials provisioned by Samsung’s own cloud during onboarding, and rejects everything else at the TLS layer with an unknown_ca alert. It’s a cloud-provisioned PKI wall, not a configuration problem. Don’t burn a weekend on it — go straight to the wired bus.
What you need
- M5Stack ATOM Lite (ESP32-PICO in a 24×24mm package, WiFi+BT) — US$7.50 from the M5Stack store
- M5Stack ATOMIC RS485 Base (stacks under the ATOM, has the RS485 transceiver and a built-in 12V→5V buck converter so the AC’s own bus power runs the whole stack) — US$9.95 from the M5Stack store
- A USB-C data cable for the first flash (more on this trap below)
- Small flat screwdriver, multimeter, and about 20cm of two-core cable (the existing controller wiring loom usually has spare tails you can piggyback)
- Home Assistant already running somewhere (any install — no add-ons needed)
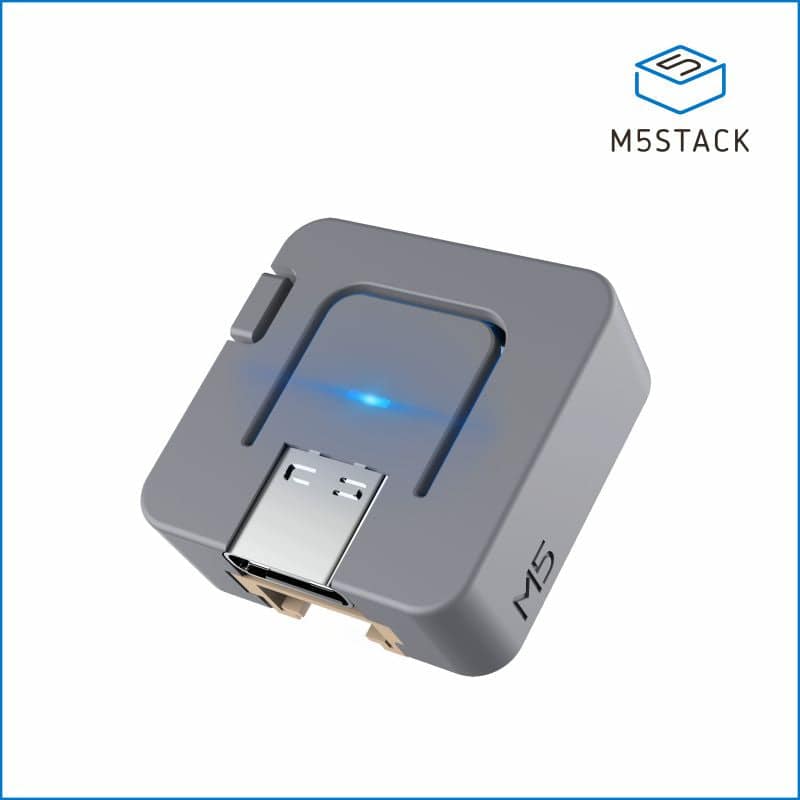
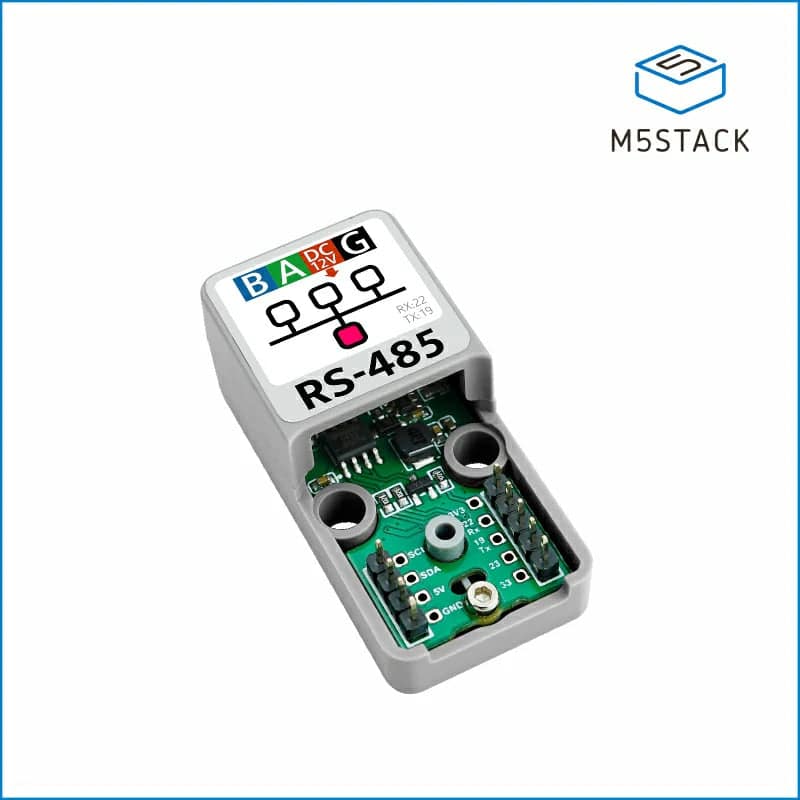
That’s the whole parts list. A generic MAX485 module plus any ESP32 dev board works too if you’d rather solder, but the M5Stack pair is plug-together, cased, small enough to sit inside the wall controller backbox, and powers itself off the AC.
Compatibility check
The component supports Samsung’s NASA protocol (most post-2015 units) and the older NonNASA protocol. Check the project’s compatibility list and its model checker for your exact model. Our ducted model wasn’t on the confirmed list at time of writing — but it’s the same NASA family, and at ~US$18 of hardware the worst case is pocket change. Ours worked on the first boot.
Before you start — safety
- Isolate the AC at the breaker before opening anything. The wall controller backbox and the indoor unit control box both live next to mains wiring.
- The F1/F2 bus is low-voltage SELV, but the same terminal strip area carries other circuits — take a photo of the terminals first and confirm which is which before connecting anything.
- F1/F2 are non-polarised — if comms don’t come up, swapping A/B on the RS485 side is safe and is the first thing to try.
- V1/V2 (12V power) ARE polarised — meter them first (V1 positive). Never feed the stack from USB and the AC’s 12V at the same time: pick one power source.
Step 1 — Assemble the hardware
Click the ATOM Lite onto the ATOMIC RS485 Base — it stacks via the pogo pins, no soldering. The base exposes a 4-pin terminal block: A, B, DC(+), GND. That’s everything the AC needs to give us: bus data and power.
Variant trap: M5Stack also sells an ATOM Tail485 (a tail module rather than a base). It looks similar but uses different GPIO pins — Tail485 is GPIO26/GPIO32, the RS485 Base is GPIO19/GPIO22. The config below matches the Base. If you bought the Tail485, change the two UART pins.
Step 2 — Build the ESPHome config
Install ESPHome (we use a Python venv on a laptop; the ESPHome add-on in HAOS works equally well):
pip install esphome
Create a secrets.yaml next to your config with your WiFi details and generated keys:
wifi_ssid: "your-2.4ghz-ssid"
wifi_password: "your-wifi-password"
api_key: "generate-with: openssl rand -base64 32"
ota_password: "generate-with: openssl rand -hex 16"
ap_password: "anything-for-the-fallback-hotspot"
(ESP32 is 2.4GHz WiFi only. The api_key must be valid padded base64 — don’t trim the = padding.)
And the main config — samsung-duct.yaml:
substitutions:
  indoor_addr: "20.00.00"    # fill in after Step 5 discovery
  outdoor_addr: "10.00.00"

esphome:
  name: samsung-duct
  friendly_name: Ducted AC

esp32:
  board: m5stack-atom

web_server:
  port: 80

api:
  encryption:
    key: !secret api_key

ota:
  - platform: esphome
    password: !secret ota_password

wifi:
  ssid: !secret wifi_ssid
  password: !secret wifi_password
  ap:
    ssid: "samsung-duct fallback"
    password: !secret ap_password

captive_portal:

uart:
  tx_pin: GPIO19   # GPIO26 if using the Tail485 variant
  rx_pin: GPIO22   # GPIO32 if using the Tail485 variant
  baud_rate: 9600
  parity: EVEN

external_components:
  - source: github://omerfaruk-aran/esphome_samsung_hvac_bus@main
    components: [samsung_ac]

samsung_ac:
  debug_log_messages_on_change: true
  capabilities:
    fan_modes: true
    vertical_swing: true   # set false if your unit rejects it
    horizontal_swing: true
  devices: []   # deliberately empty on first flash — filled in at Step 6
Note the empty devices: [] — the key must exist even when empty, and we’ll fill it after the device tells us what’s on the bus. Validate the config:
esphome config samsung-duct.yaml
Step 3 — Flash over USB
- Plug the ATOM into your computer with a USB-C data cable. If your operating system doesn’t see a serial port at all, you have a charge-only cable — this exact trap cost us an hour. The LED being on proves nothing; a data connection does.
- Run
esphome run samsung-duct.yaml. When it asks for the port, enter the number of the serial port (e.g.1), not the path. - First compile takes a few minutes (it pulls the external component and compiles the ESP32 firmware). The upload itself is quick; after the upload the console just tails the device log — Ctrl+C out of it once you see WiFi connect.
The ATOM joins your WiFi, and from here on everything happens over the network — the USB cable’s job is done. The ATOM will show up on your router (or as samsung-duct.local via mDNS).
Step 4 — Wire into the AC
The easiest tap point on a ducted unit is the back of the wired wall controller: the face plate clips off its backplate (tabs, sometimes one screw) and the bus terminals are right there at eye level — usually F1/F2 plus a 12V supply pair. Alternatively the indoor unit’s control box (in the ceiling/roof space) has the same terminals on its control strip.

- Breaker off, photo taken, terminals confirmed.
- F1 → A and F2 → B on the RS485 terminal block. Polarity doesn’t matter here.
- V1 → DC(+) and V2 → GND to power the stack from the AC’s own 12V supply (meter it first — some installations don’t provide it). The base’s built-in buck converter feeds 5V up the pogo pins to the ATOM, so no separate power is needed. If there’s no 12V on your unit, the project docs document an internal 12V tap, or just run the ATOM from a USB charger — it draws only ~250mA peak.
- Power back on. The ATOM boots and joins WiFi.
Step 5 — Discover what’s on the bus
Watch the device log:
esphome logs samsung-duct.yaml
Every 30 seconds the component sweeps the bus and reports what it finds. On a healthy connection you’ll see something like:
Discovered devices:
  Outdoor: 10.00.00
  Indoor:  20.00.00
  Other:   62.00.8c   (the wall controller)
Those three lines are the whole payload of this step: the outdoor unit, indoor unit, and controller addresses. Write them down — yours may differ. If the log shows nothing but dashes, check the wiring and try swapping A/B (F1/F2 are non-polarised, so you can’t break anything by trying).
Step 6 — Fill in the devices and update over the air
Replace the empty devices block with the discovered addresses. This is our full config — it gives Home Assistant the climate control plus every sensor worth having:
samsung_ac:
  debug_log_messages_on_change: true
  capabilities:
    fan_modes: true
    vertical_swing: true
    horizontal_swing: true
  devices:
    - address: "${indoor_addr}"
      climate:
        name: "Ducted AC"
      room_temperature:
        name: "Room Temperature"
      indoor_eva_in_temperature:
        name: "Evaporator In Temperature"
      indoor_eva_out_temperature:
        name: "Evaporator Out Temperature"
    - address: "${outdoor_addr}"
      error_code:
        name: "Error Code"
      outdoor_instantaneous_power:
        name: "Outdoor Power"
      outdoor_cumulative_energy:
        name: "Outdoor Energy"
      outdoor_temperature:
        name: "Outdoor Temperature"
      outdoor_current:
        name: "Outdoor Current"
      outdoor_voltage:
        name: "Outdoor Voltage"
      outdoor_operation_odu_mode:
        name: "Outdoor Mode"
      outdoor_operation_heatcool:
        name: "Outdoor Operation"
The sensor key names come straight from the component’s schema (check its __init__.py for the authoritative list for your unit — humidity and water-heater keys exist for other models).
Gotcha we hit: esphome upload does not recompile — it will happily ship the previous build. Always run esphome compile samsung-duct.yaml first, then esphome upload samsung-duct.yaml (it finds the device on the network and pushes over OTA — port 3232). Verify the new config took effect in the logs (Configured devices: …).
Step 7 — Home Assistant
- In Home Assistant: Settings → Devices & Services → Add Integration → ESPHome.
- Host:
samsung-duct.local(or the device’s IP). - When asked for the encryption key, paste the
api_keyfrom yoursecrets.yaml(the full padded base64 value). If the dialog refuses a key you know is correct — we hit exactly this — the key can be verified against the compiled firmware, and the integration can also be added programmatically via Home Assistant’s REST config-flow API, which is what we ended up doing.
That’s it — no Samsung account, no cloud, no token. The integration talks to the device on your LAN, encrypted, and the AC appears as a full climate entity with every sensor you configured.
Step 8 — The status LED (know it’s alive from the floor)
The ATOM Lite has an onboard RGB LED, which is perfect for a device you’ll never see again after the ceiling goes back. Ours shows: red = no WiFi, green = WiFi but the AC bus has gone quiet, blue = WiFi and live AC comms. So a blue light means everything is healthy; green while the AC is powered means the bus wiring got knocked; red means network trouble.
Pin fact that cost us a reflash: the ATOM Lite’s onboard RGB is an SK6812 on GPIO27 — GPIO25 is the commonly mis-cited pin. Add this to the config:
globals:
  - id: g_last_bus_ms
    type: uint32_t
    restore_value: false
    initial_value: "0"

light:
  - platform: esp32_rmt_led_strip
    id: atom_led
    name: "Ducted AC Status LED"
    pin: GPIO27
    num_leds: 1
    rgb_order: GRB
    chipset: SK6812
    is_rgbw: true
    restore_mode: ALWAYS_OFF
    default_transition_length: 0s

interval:
  - interval: 1s
    then:
      - if:
          condition:
            lambda: 'return wifi::global_wifi_component == nullptr || !wifi::global_wifi_component->is_connected();'
          then:
            - light.turn_on:
                id: atom_led
                brightness: 25%
                red: 100%
                green: 0%
                blue: 0%
          else:
            - if:
                condition:
                  lambda: 'return id(g_last_bus_ms) != 0 && (millis() - id(g_last_bus_ms)) < 15000;'
                then:
                  - light.turn_on:
                      id: atom_led
                      brightness: 25%
                      red: 0%
                      green: 0%
                      blue: 100%
                else:
                  - light.turn_on:
                      id: atom_led
                      brightness: 25%
                      red: 0%
                      green: 100%
                      blue: 0%
The g_last_bus_ms global is a “bus heartbeat”: the samsung_ac component has no bus-connected callback, but any sensor publishing proves the bus is alive. Stamp the timestamp in a sensor filter (the error-code sensor is ideal — it publishes every 2–3 seconds):
      error_code:
        name: "Error Code"
        filters:
          - lambda: |-
              id(g_last_bus_ms) = millis();   // bus heartbeat
              return x;
Cadence trap: hook the heartbeat to your most-frequent publisher and make the window strictly bigger than its gap. We first hooked room temperature — which only publishes when the value changes — and the light sat stubbornly green while everything worked. The error-code sensor’s steady 2–3s cadence with a 15s window fixed it. Compile, upload over OTA, done.
What you end up with
A fully local climate entity plus a genuinely useful sensor set — all pushed into Home Assistant over the encrypted native API:
- Climate control — mode, setpoint, fan, swing
- Room temperature
- Outdoor power (watts) — the outdoor unit’s real wattmeter, live
- Outdoor energy (kWh) — lifetime consumption, feeds the HA Energy dashboard
- Outdoor current & voltage, outdoor temperature
- Evaporator in/out temperatures — the delta across the indoor coil is your actual delivered heating/cooling
- Error code + compressor mode/operation text — diagnostics for free
Add the energy sensor under Settings → Dashboards → Energy → individual device and the AC’s consumption starts charting against your electricity pricing — something the Samsung app charges you for the privilege of seeing.
The numbers
Hardware: US$7.50 + US$9.95 = US$17.45 (about A$30 landed) — no soldering, no tools beyond a screwdriver and a multimeter. The SmartThings personal plan is US$4.99/month, about A$90 a year, forever. The build pays for itself in under five months, and then it’s free — with lower latency than the cloud round-trip, and it keeps working when the internet doesn’t.
Troubleshooting
- No serial port when flashing — charge-only USB cable. Use a data cable.
- Discovery shows only dashes — wiring. Swap A/B, confirm F1/F2 (photo of terminals), confirm 12V across V1/V2 (or power the ATOM over USB temporarily).
- Discovery works, but upload “succeeds” with old config — you skipped the compile.
esphome uploaddoesn’t rebuild. - HA rejects the API key that you know matches secrets.yaml — re-enter the host as the raw IP; the dialog’s pre-fill can be wrong.
- Status LED stuck green — heartbeat hooked to a sensor that publishes rarely (room temp only publishes on change). Hook the error-code sensor instead.
- Current/voltage read zero — normal while the compressor is idle; those messages aren’t broadcast until there’s load.
Wrapping up
From unboxing to a fully instrumented, cloud-free air conditioner was a single day of tinkering, most of it spent learning the gotchas we’ve written up above. The hardware is now permanently powered by the AC itself, the wall controller still works exactly as before, and Home Assistant has complete control and monitoring — with a status LED that tells us from across the room that everything is healthy.
If you’re attempting this on your own Samsung unit, the project’s documentation and its GitHub discussions are excellent, and you’re welcome to post a comment below — we’ll help if we can.
Discover more from JRB Consulting
Subscribe to get the latest posts sent to your email.