
WiFi is a fickle beast and WiFi connected IoT gear can be unreliable at best. Tuya has thrown their WiFi IoT chips into anything that beeps, buzzes, spins and dings with the aim to ensure your whole house can be controlled remotely. For a Home Assistant user striving for complete local control, this is where LocalTuya comes in. But it’s not that simple to add all your Tuya devices.
This article is how to add the Arlec 130cm GRID Connect Smart Madrid ceiling fan w/light to your LocalTuya.
The moving parts needed for this are:
- Home Assistant server (I have HAOS installed on an old Surface Pro) with LocalTuya installed
- WiFi network broadcasting in 2.4ghz (not 5ghz)
- An Arlec GRID Connect fan – we bought ours from Bunnings (DCF4002BHA)
- The remote for the fan
- A whole lot of patience
Pair your device with Tuya and get the device details ready
Once you have installed your fancy new WiFi fan, make sure
As with adding any piece of hardware to LocalTuya, the hardest part is getting it’s device ID and secret key.
If you don’t know how to do this, read our article on it here.
Once you have your device connected to your WiFi network, we strongly recommend assigning it a static IP address to ensure it doesn’t jump around and get lost. This is usually found in your router’s DHCP lease section.
The LocalTuya magic
Open up your Home Assistant instance and navigate to your Settings -> Devices & Services .
Select the LocalTuya integration.
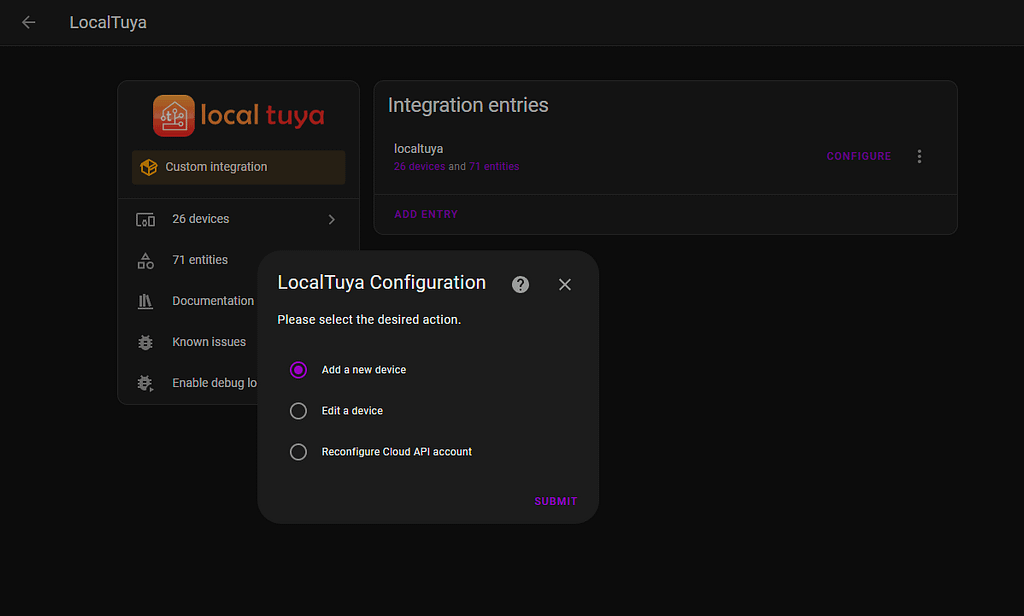
Hit the Configure button and a tidy little window will pop up asking you to choose whether you’d like to add a new device, edit a device or reconfigure Cloud API account.
For the purposes of this walkthrough, we will be choosing ‘Add a new device’
I have a fan in my office that I’m going to go through adding to LocalTuya. It has a light and fan component.
I also have put in my Cloud API details into LocalTuya so it will automatically pull in all the devices on my network.
Choose the device you wish to add – the names listed will be populated from the Tuya app, and hit ‘Submit’

The next screen will be largely populated and you shouldn’t have to change anything.
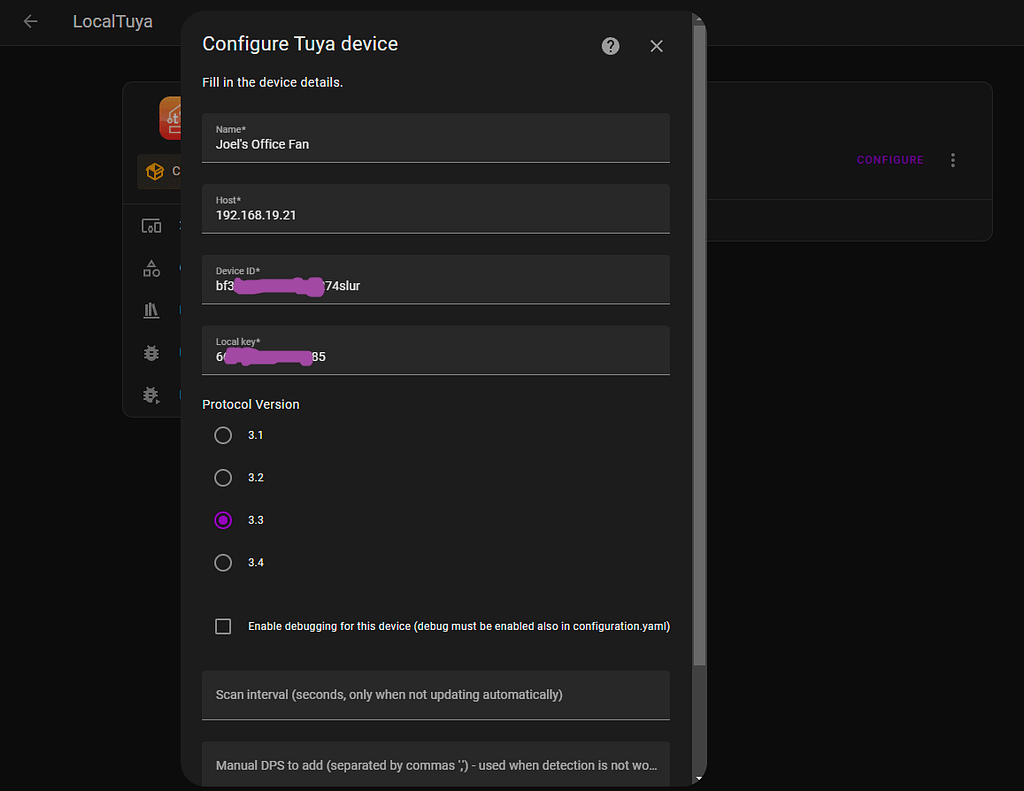
I would just double check that the IP address listed is the current one assigned to your device. It will often take a bit of time to refresh if your DHCP lease expires or you’ve recently assigned a static IP address.
Also double check that your Device ID and Local Key matches what is listed on the Tuya IoT portal for your device.
Once you’re happy, hit ‘Submit’ down the bottom and it will attempt to connect to your device.
You do not have to have your device in pairing mode to connect to it, but it must be paired to the Tuya app, and switched on.
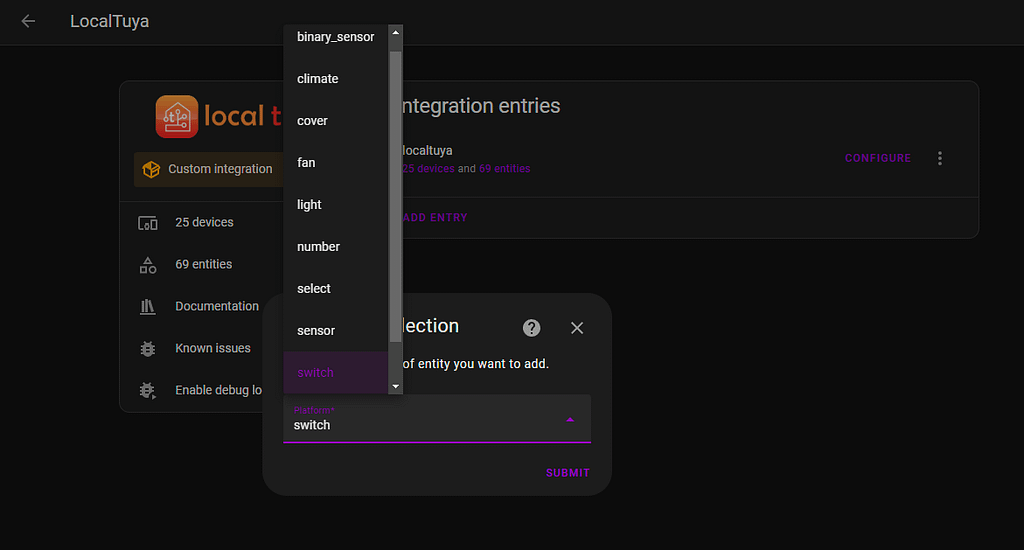
The next screen starts us adding what Home Assistant Entities we want to create.
For this fan, it will be a light and then a fan.
So first off select ‘Light’ and hit ‘Submit’.
On this next screen, only change the following settings, it should match my screenshot, with exception of using your own name.
5. Select the EZSP firmware as pictured above and hit ‘Install’. It takes about 5 minutes and will flash your SkyConnect with the fresh new and latest version of the EZSP firmware.
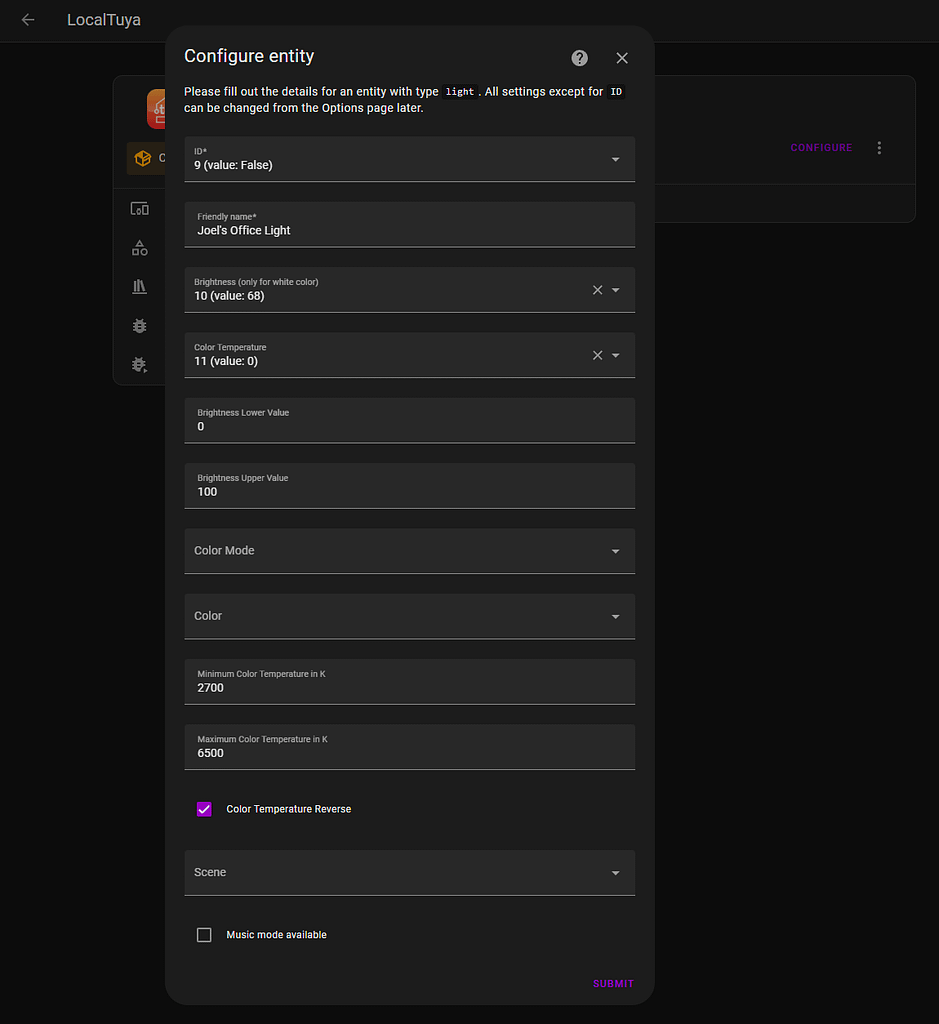
| ID | Make sure this is set to ‘9’. It should be a True/False value |
| Friendly Name | Choose your own name |
| Brightness (only for white color) | Make sure this is set to ’10’. It should be a number value |
| Color Temperature | Make sure this is set to ’11’. It should be a number value |
| Brightness Lower Value | Set this to ‘0’ |
| Brightness Upper Value | Set this to ‘100’ |
| Color Temperature Reverse | Make sure this box is checked |
Once you’ve changed only those settings, hit ‘Submit’.
It will drop your back to the Entity Type selection screen.
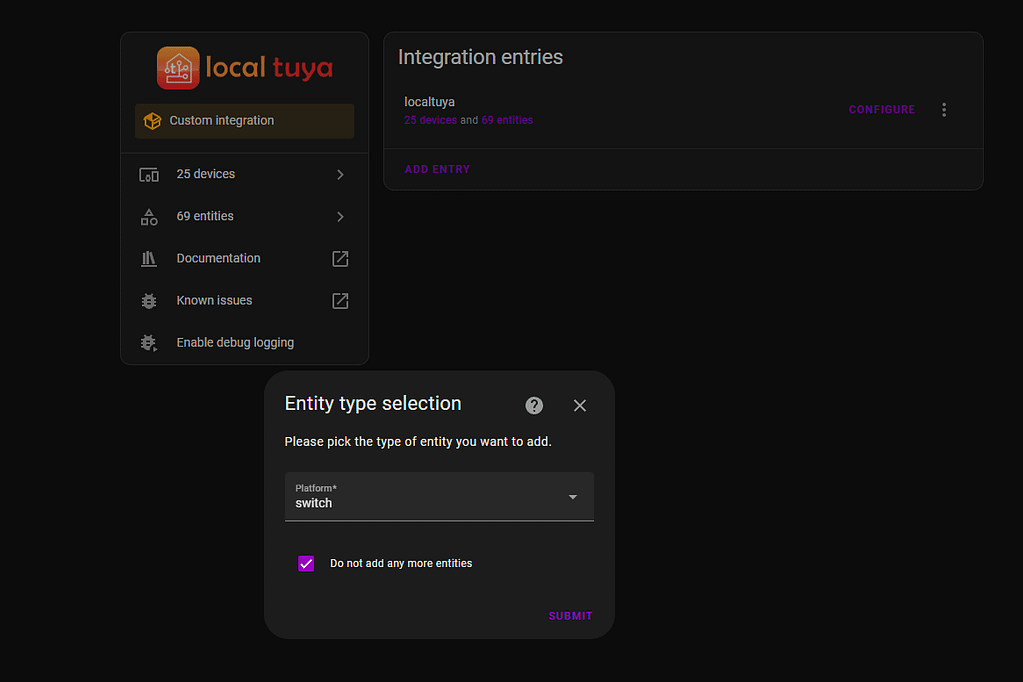
This time select ‘Fan’, uncheck the ‘Do not add any more entities’ checkbox and hit ‘Submit’
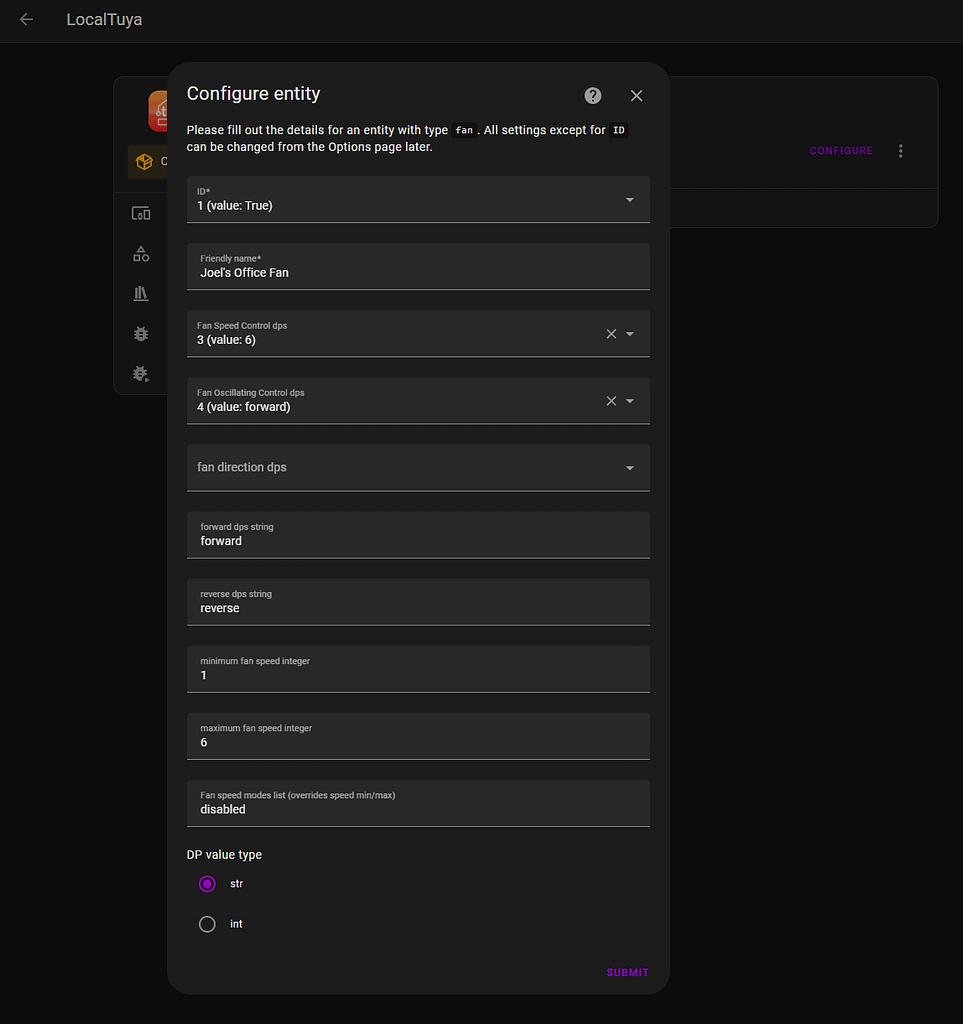
As with the light previously, once change the below settings to match the image above.
| ID | Make sure this is set to ‘1’. It should be a True/False value |
| Friendly Name | Choose your own name |
| Fan Speed Control dps | Make sure this is set to ‘3’. It should be a number value |
| Fan Oscillating Control dps | Make sure this is set to ‘4’. It should be a forward/reverse value |
| Minimum Fan Speed Integer | Set this to ‘1’ |
| Maximum Fan Speed Integer | Set this to ‘6’ |
After confirming all the settings are correct, hit ‘Submit’.
This will drop you back to the Entity Type Selection screen.
Without changing anything, hit ‘Submit’ to finish adding your fan and light.
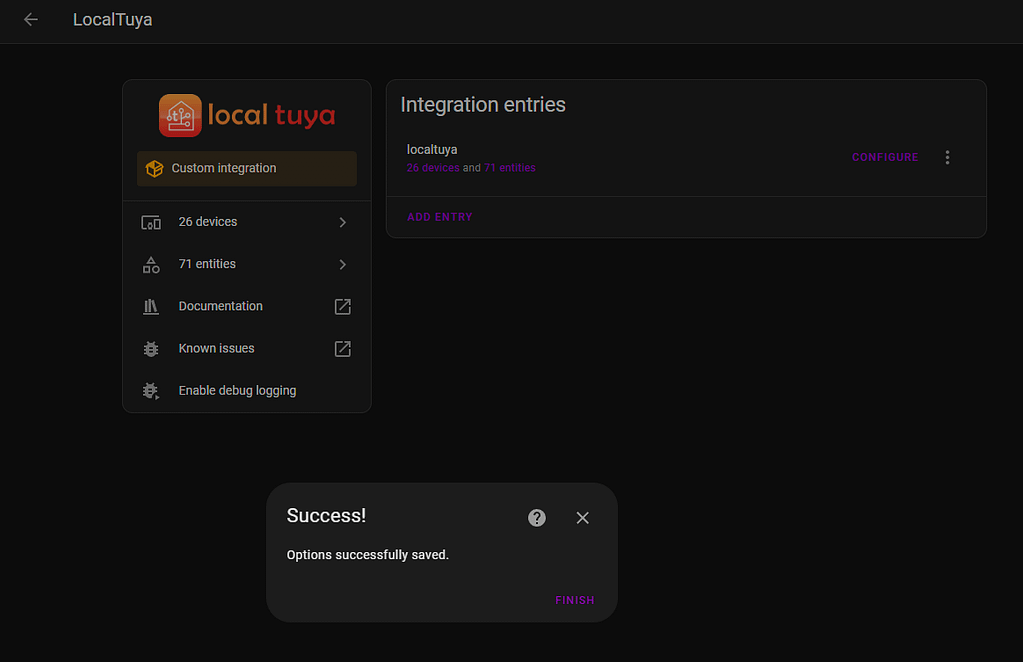
Providing everything has worked, you’ll be greeted with a success screen and a newly added LocalTuya device.
0 Comments